Showing posts with label bread. Show all posts

Tuesday, March 17, 2015

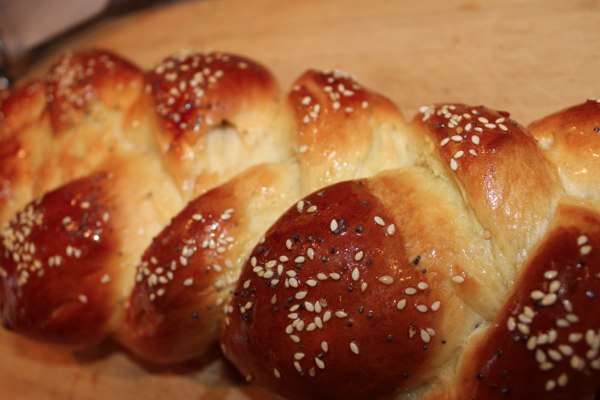
Easy Challah Bread

This is a Jewish egg bread, often braided for a beautiful presentation. Top it with sesame or poppy seeds or try adding raisins to the batter! 


Ingredients


1 (.25) pkg dry active yeast
1 cup warm water (100-110 degrees)
2 tbsp honey
1 tsp salt
3 eggs, beaten
3 1/2 cups flour (more if you will be kneading by hand, I used my dough hook)
1 egg yolk for brushing over bread before baking, or 2 tbsp butter melted


In a large bowl, mix together your yeast and the water.  Let the mixture stand until it looks kind of, cloudy and scummy.  Yea, I know, real technical term.  It should take about 10 minutes.  At this time you will need to stir in the honey and salt, until it is all dissolved and add the beaten eggs..  Mix in the flour a little bit at a time, until the dough becomes sticky.  Sprinkle flour on the dough and knead it until it is smooth, about 5 minutes. 
Now, shape the dough into a ball, and place in a bowl that has been sprayed with nonstick spray or brushed with oil. Let it rise in a warm, draft free place until doubled in size.  It will take 45 minutes to an hour.


Preheat oven to 350 degrees.

Punch the dough down and cut it into 3 equal pieces.  On a floured surface roll the small pieces into ropes about the thickness of...hmm...a cigar and about 12 inches long.  The ropes should be a little fatter in the center than the edges.  Now, let's be real, mine were far from perfect, they were fatter than they should have been but as you can see, it turned out perfectly fine. Pinch the ends together and flip them under. Place the beautifully braided loaf onto a baking sheet lines with parchment paper.  Brush the top with beaten egg yolk and also brush where the bread touches in the braid so it holds together when you s slice it.  You can also used melted butter.


Bake the challah in a preheated oven until the top turns a beautiful rich brown color and the loaf sounds hollow when you tap on it.  It should take 30-35 minutes.  Place it on a wire rack to cool when it is done!


Friday, March 13, 2015

Ojibwe Bannock Bread

Ingredients

  • 1 tsp. salt 4 Tbs. fat (animal lard or shortening) 
  • 4 Tbs. baking powder 
  • 4 cups flour 
  • 2 cups water


Directions
 

Preheat oven to 350 degrees. Grease a 9x12 (rectangle) cake pan.

Stir flour, baking powder, and salt together thoroughly.

Cut in (room temperature) fat to flour mixture until pea sized lumps are formed in flour.

Make a "lake" in the flour and pour water in your "lake."

Mix gently with fork until a nice and sticky dough is formed.

Place in greased pan and pat down with hands softly.

Fry in skillet until golden brown.

Important step: place out of pan on towel, leaned up on its side against a pot to cool.


Monday, March 2, 2015

Bacon Stuffed French Toast

For this recipe, I went with a bacon and cream cheese stuffing but feel free to get creative and try different combos!

Peanut butter + jelly,
Cream cheese + jam,
JalapeƱo + cheddar
Banana + chocolate
Apple & brie...

The possibilities are endless! Feel free to share your creations or stuffing ideas in the comment section below. Have fun!


Ingredients:

  •  1 loaf of bread (about 18 slices) 
  • 1 (16oz) package maple flavored bacon 
  • 1 (8oz) package cream cheese, softened 
  • 1 1/4 packed cups brown sugar 
  • 1 tsp maple extract 
  • 5 eggs 
  • 1/3 cup + 3 tablespoons milk 
  • 2-3 tablespoons butter 

Instructions:

Cook the bacon in a skillet until crispy. Drain on paper towels and set aside.
Beat together the softened cream cheese, brown sugar, and maple extract until creamy.
Spread the mixture on each of the 18 slices of bread.
Break the pieces of bacon in half, and distribute evenly amongst half of the bread slices.
Top with remaining slices of bread. In a shallow dish, like a pie plate – whisk together the eggs and milk.
Dip both sides of the ‘sandwiches’ in the egg mixture.
Melt the butter in a skillet or a griddle.
Cook the french toast on both sides until nicely browned.
Serve with butter and syrup.

Tuesday, February 17, 2015

Sweet Buttermilk Biscuits

I found this super easy recipe, which is just awesome for whipping up some quick (but oh so yummy) biscuits. No eggs, no yeast and no waiting before baking! Light, moist and delicious, this recipe is purrrfect for busy bees like me! Enjoy!

Prep Time: 15 minutes
Cook Time: 15 minutes
Total Time: 30 minutes

Yield: 12-14 biscuits


Ingredients:

  • 6 tablespoons unsalted butter 
  • 2 cups all purpose flour 
  • 1 tablespoon sugar 
  • ¼ teaspoon baking soda 
  • 1 tablespoon baking powder 
  • 1 teaspoon salt 
  • 1 cup buttermilk (or sour milk)

Instructions
  1. Preheat oven to 450 degrees.
  1. Cut butter into small pieces. Spread the butter pieces on a dinner plate and place in the freezer while you measure out and mix the dry ingredients. The butter should be cold but not frozen.
  1. In a large bowl, sift together flour, sugar, baking soda, baking powder and salt.
  1. Note: It is very important that you work quickly through these next steps so the butter does not warm up and soften too much.
  1. With a pastry cutter or two knives, cut the cold butter into the flour mixture until it resembles small crumbs (the size of a pea).
  1. Make a hole in the middle of the flour and add buttermilk. Gently stir until the dough is mixed together but still tacky. If it’s too dry, add more buttermilk.
  1. Pour the mixed dough out onto a floured surface and pat gently into a rectangle.
  1. Fold the dough onto itself six times then pat down to 1 inch thick.
  1. With a 2 ½ inch round biscuit cutter, push down to cut the dough and pull up without twisting the cutter and the dough. Any leftover scraps can be combined and cut again – but just once; reusing any scraps after that will make the biscuits tough.
  1. Arrange the biscuits on a parchment-lined cookie sheet almost touching each other and bake for 12-15 minutes until browned.
  1. Optional: After they are baked, you can also brush the tops with melted butter and sprinkle more sugar on top if you wish for added sweetness.

Monday, September 22, 2014

Fall Food Recipes & Gift Labels!


I loooooove fall. I never used to. Why? Because I never gave it a chance until a few years ago! Growing up in the Great White North (off Lake Superior), autumn basically meant winter. Fortunately, Ottawa is different. Fall arrives slowly, giving me time to admire it, taste it, accept it and even LOVE it.

Saying farewell to summer doesn't have to be so gloomy when you've got some amazing fall fruits, veggies and beauty to take in and inspire you until it's time to shovel the driveway.... *ugh*.

I hope you take the time to indulge in autumn, play in the leaves, bring the kids apple picking, harvest your crops, even if they are minimal, and take pride in the deliciousness you've created and or cultivated!

Here are some of my favourite Pinterest fall foods recipes for you to try as well as some beautiful fall themed labels for food gifts!